
Before you start
If your face appears unfamiliar, rounded, or disproportionate in a smartphone photo, camera distance is one useful factor to check, alongside lighting, viewpoint, mirroring, lens correction and processing. When you hold a smartphone at arm's length—typically between 12 and 18 inches from your face—the lens sits disproportionately close to your central features. This close physical proximity creates perspective distortion: the nose and center of the face appear larger, while the ears, jawline, and temples recede into the background.
Before you alter your lighting, change your grooming, or assume a digital photo tool misrendered your likeness, check the physical distance between your lens and your face. Correcting perspective does not require specialized studio gear; try a more distant viewpoint and compare the result with familiar unedited photos.
Perspective Distortion vs. Optical Distortion vs. AI Identity Shift
Evaluating why a portrait looks unusual requires distinguishing between three separate visual mechanisms that are frequently confused:
1. Perspective Distortion (Subject-to-Camera Distance)
Perspective depends on the camera viewpoint relative to the subject, including distance and angle. When a lens is placed very close to a three-dimensional object like a human head, the relative distance between near features (the tip of the nose) and far features (the ears) is significant. If your nose is 12 inches from the lens and your ears are 16 inches away, your nose is 25% closer to the camera. That proportional difference makes central features look pronounced and flattens lateral contours.
Moving farther away reduces the relative size difference between near and far features; there is no universal distance that establishes one true appearance. Importantly, focal length and zoom alone do not alter perspective. As noted in mobile photography guidance from Adobe Express, stepping back physically and using portrait-oriented framing settings helps balance facial dimensions. Cropping a wide photo taken from six feet yields the exact same perspective as an optical zoom from six feet; the critical physical variable is the distance between the camera and the face.
2. Optical Lens Distortion (Barrel Aberration)
Optical distortion is an aberration produced by the physical glass elements of a lens. Wide-angle smartphone cameras sometimes exhibit barrel distortion, where straight lines near the periphery curve outward. While barrel distortion can bend facial features near the edge of a frame, it is structurally distinct from perspective distortion. Optical distortion depends on lens curvature and digital lens corrections, whereas perspective distortion occurs on any theoretically perfect lens whenever the viewpoint moves too close.
3. AI Identity Drift
When testing digital styling previews or generative portrait tools, users occasionally notice altered eye shapes, shifted dental alignment, or unnatural bone contours. This is algorithmic identity drift, not an optical artifact. A generated preview can preserve or alter features visible in the source. Compare it directly with the source and with familiar unedited photographs; do not assume a particular model will automatically correct perspective.
Portrait discussions in communities like Reddit r/AskPhotography and Reddit r/AskPhotography frequently highlight individuals puzzled by how different their front camera portraits look compared to their mirror reflections. Photographers consistently emphasize that close camera positioning is the physical culprit behind perceived facial warping.
Step-by-Step: How to Capture a Natural-Perspective Portrait at Home
To compare perspective and produce an honest baseline photo for professional profiles or styling planning, follow this structured capture sequence:
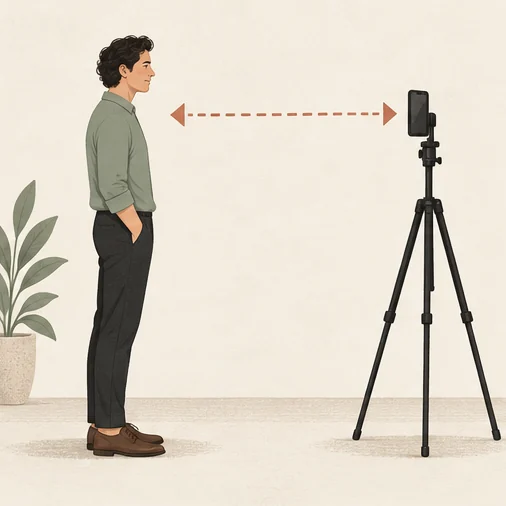
- Test a More Distant Camera Position: Do not hold the phone in your hand. Handheld capture constrains your distance to arm's length. Mount your phone on a tripod, a shelf, or a desk mount positioned approximately five to seven feet (1.5 to 2 meters) away from where you will stand or sit.
- Align the Lens at Eye Level: Position the camera lens directly level with your eyes. Angling the camera downward foreshortens the chin and elongates the forehead, while tilting upward overemphasizes the jaw and neck. A level camera preserves neutral vertical balance.
- Choose a Camera Mode or Crop That Preserves Enough Detail: Standing five to seven feet away creates a wider scene than you need for a headshot. Rather than moving the camera forward, use an available camera or crop mode that retains enough resolution; a 2× or 3× label does not always mean a separate optical lens, or capture at native 1× resolution and crop the frame down to head-and-shoulders afterward. Because your physical distance remains fixed at six feet, the cropped image retains natural perspective without wide-angle foreshortening. For comprehensive lighting and framing setups, review our guide to capturing a professional headshot at home.
- Maintain a Relaxed, Neutral Neck Posture: People often jut their chins toward the camera when posing. Keep your neck relaxed, your shoulders level, and your chin parallel to the floor to prevent posture-induced distortion.
- Verify Proportions Against an Unedited Reference: Open your new capture alongside a photo taken by a third party from a normal social distance. Confirm that your nose, cheekbones, and ears appear in the same proportion as your everyday reflection before using the photo as a public portrait or input source.
Camera Distance and Framing Decision Guide
Use this reference to understand how camera distance affects facial geometry across common capture methods:
| Test | What changes | What to inspect |
|---|---|---|
| Close handheld capture | Near and far features have a larger relative distance difference | Compare central features and ear visibility without treating either as a flaw |
| More distant capture | Relative depth differences decrease | Check likeness, focus and whether the crop retains enough pixels |
| Zoom or crop from the same viewpoint | Framing changes; perspective is essentially unchanged | Check resolution and device processing rather than assuming optical zoom |
| Camera moved higher or sideways | Viewpoint and facial projection change | Compare head angle and background while keeping other conditions steady |
Quick Pre-Upload Perspective Checklist
- Did you compare a more distant viewpoint with the close capture?
- Is the lens positioned horizontally level with your eye line?
- Does the result remain familiar at the chosen head angle? Ear visibility is not a required test.
- Did you use optical zoom or a distant crop rather than moving the camera closer?
- Is the lighting even across facial planes without harsh, localized flash glare?
A Hypothetical Walkthrough: Correcting a Distorted Baseline Photo
Consider Alex, a freelance project manager preparing an updated portrait for client proposals and directory listings.
- The Initial Arm's-Length Capture: Alex holds a smartphone at arm's length in good natural window light. While the lighting is clear, Alex feels the portrait looks subtly "off"—the nose seems slightly wide, the face appears unusually round, and the ears are almost entirely obscured.
- Diagnosing the Problem: Rather than assuming personal dissatisfaction with facial features, Alex inspects the capture method. The camera lens was barely 14 inches away, creating substantial perspective distortion.
- Adjusting the Distance: Alex places the phone on a bookshelf six feet away, stacks two hardcovers underneath to align the lens with eye height, and sets the phone camera to an available 2× mode with a 5-second timer.
- Evaluating the New Frame: In the new six-foot capture, Alex's facial proportions look more familiar to Alex in this hypothetical comparison. The cheekbones, nose bridge, and jawline sit in natural balance, and the ears appear in proper proportional context.
- Checking Overall Quality: Before finalizing the portrait or testing wardrobe variations, Alex reviews the AI portrait quality checklist to verify focus sharpness, natural skin texture, and absence of edge artifacts.
Common Evaluation Mistakes and Technical Boundaries
Avoiding distorted portraits is straightforward once you eliminate common procedural misconceptions:
- Assuming Zoom Changes Perspective Without Moving: Zooming in while standing two feet away magnifies the image, but it does not change the physical distance between your lens and your features. You must step back physically to alter the depth ratio.
- Relying on Software Reshaping or Slimming Tools: Post-processing filters that manually pinch noses or narrow jawlines do not correct perspective distortion; they apply arbitrary geometric warping that frequently looks unnatural and creates uncanny artifacts. Always fix perspective at capture time through physical distance.
- Using Close Selfies for Styling Exploration: Generative platforms like LookScene allow you to preview hairstyles, outfits, and portrait backgrounds from your own photos. However, LookScene is an exploratory planning tool, not an identity-altering engine, beauty scoring system, or cosmetic reshaping filter. If you upload a distorted arm's-length selfie, the preview may preserve or alter that perspective, so compare it with the source. Starting with an undistorted, five-to-seven-foot capture provides a better basis for checking whether an AI hairstyle preview still looks like you.
- Confusing Lens Distortion With Natural Asymmetry: Human faces are naturally asymmetrical. Minor differences between eye heights or jaw contours are authentic physical traits, not optical errors. Perspective distortion specifically manifests as depth-based magnification of near features relative to far features.
Next Steps: Establish an Honest Baseline Before Exploring Styles
Compare a comfortable, more distant camera position with your close selfie while keeping light and expression similar. Choose a recognizable result that meets the intended crop and resolution requirements.
Once you have a naturally proportioned baseline photograph, use digital styling tools as an exploratory aid. You can test varied wardrobe collars, color contrast, and background settings to plan your look without committing to irreversible alterations. Compare every visual preview directly against your undistorted baseline photo to ensure your final presentation remains recognizable, professional, and grounded in real-world styling.
Style options to compare
Use these illustrated directions to plan what to try. They are not verified before-and-after results; inspect the review checklist on each page.
- Clean studio portrait — Compare the eyes, jaw, hairline and skin against the original. Crop for your intended profile size after reviewing.
- Warm studio — Check that warm background color does not unnaturally tint the face.
- Garden light — Inspect hair edges and ensure foliage does not cross the face.


