
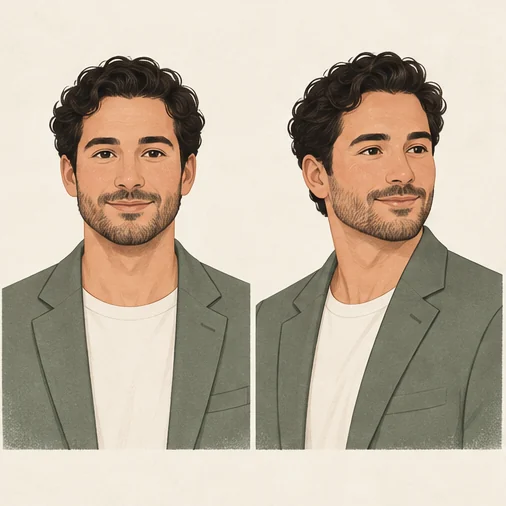
Before you start
When preparing for a professional headshot, the angle of your shoulders establishes the baseline geometry of the entire image. Sitter dilemmas often center on two choices: squaring your chest directly toward the lens or rotating your torso slightly to one side.
Neither posture is universally superior. A straight-on pose creates a more symmetrical shoulder arrangement, making it a reliable standard for formal directories, executive cards, and academic rosters. In contrast, a slightly turned pose—with no required angle—introduces diagonal lines, separates the chin from the shoulder line, and breaks up rigid rectangular framing.
The goal of adjusting your body angle is not to conform to an arbitrary modeling formula, but to find a natural, comfortable posture where your face remains fully recognizable, your clothes sit cleanly, and your neck remains relaxed.
The Mechanics of Shoulder Angles in Headshot Framing
A standard professional headshot crops tightly around the chest and head, keeping hands and lower limbs outside the frame. Because the frame contains limited visual elements, small changes in upper-body positioning significantly alter composition, lighting, and garment behavior.
1. Torso Alignment vs. Facial Plane
A common misconception is that turning the shoulders means turning the entire head. In an effective turned headshot, the torso rotates slightly while the head remains comfortably oriented toward the camera. Keep a comfortable head direction and check that both eyes are in focus; exact symmetry is not required. According to the Adobe Express portrait photography guide, making small body-angle adjustments while keeping the face toward the camera adds visual depth to portraits, though no single pose works universally for every individual.
2. Neckline and Garment Drape
Shoulder rotation directly impacts how collars, lapels, and necklaces sit:
- Straight-On: Lapels and shirt collars maintain visual symmetry. Tie knots hang centered down the placket, and crew necks or scoop necks display even curves across the collarbones. However, if your jacket is tight across the chest, standing square can cause button pulls or horizontal tension lines.
- Slightly Turned: Turning rotates one side of the chest toward the lens and the other away. This can soften stiff shoulder lines, but it also creates asymmetry in structured garments. The lapel facing away from the camera can buckle, gap away from the neck, or fold unevenly if the turn is too sharp.
3. Light Falloff and Directional Contrast
Shoulder orientation and light placement work together. Facing the camera does not guarantee even shoulder lighting, and turning does not guarantee a soft shadow. Keep the light fixed while comparing poses, then inspect highlights, shadow edges and fabric detail. Adjust the pose or light if the result does not suit your intended image.
4. Ergonomics and Muscle Tension
Camera lenses magnify physical strain. When sitters force an exaggerated twist, the sternocleidomastoid tendons in the neck tighten, the trapezius muscles bunch upward, and the jawline stiffens. In community discussions on portrait technique, such as threads in r/photography and r/AskPhotography, photographers and sitters frequently note that people feel unnaturally rigid when forced into standardized posture formulas. Natural comfort must take priority over rigid angles; if holding the pose requires noticeable muscular effort, that tension will register in the final portrait.
How to Test Both Angles Systematically
To determine which shoulder angle best complements your attire and personal presence, conduct a structured two-angle test before committing to a final image.
       Straight-On                       Slightly Turned (10°–20°)
    ┌────────────────┐                      ┌────────────────┐
    │     [Head]     │                      │     [Head]     │
    │     (Lens)     │                      │     (Lens)     │
    │  ┌──────────┐  │                      │   ┌────────┐   │
    │  │ Shoulders│  │                      │  / Shoulders\  │
    │  │  Square  │  │                      │ /   Angled   \ │
    └────────────────┘                      └────────────────┘
    • Symmetrical framing                  • Diagonal leading lines
    • Direct, formal presence              • Relaxed chest depth
    • Demands relaxed shoulders            • Check trailing lapel gap
Step 1: Set Up an Eye-Level Baseline
Mount your camera or smartphone strictly at eye level. Camera height changes the viewpoint; eye level is a useful starting comparison. Ensure the primary light source is soft and diffused. If you are staging your session independently, review practical setup practices in our guide on taking a professional headshot at home.
Step 2: Capture the Straight-On Reference
- Stand or sit tall with feet flat on the floor and hips parallel to the camera.
- Inhale deeply, roll your shoulders back, and let them drop naturally on the exhale to release trapezius tension.
- Keep your chin level, look directly into the center of the lens, and capture several frames. Ensure your hands remain naturally relaxed at your sides and outside the crop.
Step 3: Introduce a Subtle Core Rotation
- Without moving your head, rotate your torso from the hips approximately 10 to 15 degrees toward your preferred side.
- Gently pivot your head back toward the camera so your nose points directly at the lens.
- If a larger turn feels strained or twists your clothing, reduce it.
- Verify that your rear shoulder does not drop lower than your front shoulder unless naturally resting that way.
Step 4: Audit and Compare the Results
Review both captures side-by-side using an AI portrait quality checklist to evaluate critical criteria:
- Are both eyes sharp and clearly defined?
- Does the neck appear relaxed without visible strain lines?
- Does your garment collar remain flush against the back of your neck?
- Does the portrait look like you when someone meets you in person?
Comparison Matrix: Straight-On vs. Slightly Turned
| Feature | Straight-On Pose | Slightly Turned Pose (10°–20°) |
|---|---|---|
| Primary Visual Effect | More symmetrical shoulder framing | Diagonal shoulder framing |
| Common Use Cases | Corporate directories, board bios, formal profile cards | Creative portfolios, LinkedIn profiles, consulting sites, speaker cards |
| Garment Compatibility | Ideal for high-symmetry collars, ties, and structured formal blazers | Excellent for open collars, casual jackets, crew necks, and knits |
| Lighting Sensitivity | Prone to flat rendering under direct forward lighting | Creates natural light-to-shadow gradient across the chest |
| Main Vulnerability | Can look like an institutional ID badge if shoulders hunch | Rear lapel or collar may gap, bunch, or ride up |
| Neck & Jaw Comfort | Little head-to-torso rotation; check comfort | Minor rotation; requires checking for strained neck cords |
Practical Pre-Shoot Pose Checklist
Before finalizing your headshot angle, run through this quick audit:
- Frame Boundary: The crop terminates at the mid-chest; elbows and hands remain outside the frame.
- Camera Height: The lens is aligned directly with eye level, not tilted upward or downward.
- Head Alignment: Face and gaze remain directed at the camera sensor regardless of torso rotation.
- Collar Inspection: The collar sits flat against the neck on both sides without gapping or folding under.
- Shoulder Balance: Shoulders are dropped and relaxed, avoiding defensive hunching.
- Tension Check: The neck, jaw, and mouth remain neutral with no visible straining of throat tendons.
- Comfort Test: The posture can be held comfortably for the time needed to capture a frame without shifting or holding breath.
Hypothetical Example: Testing Suit Lapels and Rotation
To see how these adjustments interact with clothing, consider a hypothetical professional named Morgan who is updating a consulting profile image.
Morgan wears a tailored charcoal wool blazer over a crisp collared shirt. During the initial shoot, Morgan stands straight-on toward the camera. The resulting image displays sharp, clean symmetry across the lapels, but the wide square framing combined with flat office lighting creates an overly rigid, administrative look.
Attempting to fix this, Morgan tries a 45-degree turn. While the angle breaks up the rectangular shape, the trailing lapel pulls away from the collar by nearly two inches, the shirt collar twists sideways, and the neck tendons on the turning side stand out prominently under the key light.
Morgan then resets to a subtle 12-degree turn:
- The feet and torso turn just enough to break the horizontal line of the shoulders.
- The head remains square to the lens, while Morgan checks comfort.
- The blazer's trailing lapel stays in contact with the shirt fabric without gapping.
- Soft shadows develop naturally across the receding shoulder, creating depth while keeping the focus squarely on Morgan's face.
By testing minor degrees of rotation rather than adopting an extreme pose, Morgan achieves visual depth while maintaining garment integrity and natural recognition.
Common Mistakes to Avoid
1. The Universal 45-Degree Myth
There is no required 45-degree turn and no universal ban on it. Compare a straight-on pose with a small comfortable turn first. Increase the turn only if it suits your intended framing, clothing and comfort.
2. Confusing Body Angle with Body Reshaping
Pose angles should never be treated as tools for artificial body reshaping, slimming, or altering natural proportions. Attempting to hide or distort body geometry through awkward contortions invariably results in unnatural head angles, compressed chin lines, and an unrelaxed expression. The objective of shoulder positioning is comfortable balance and clean composition, not physical alteration.
3. Ignoring Asymmetric Fabric Bunching
When you rotate your torso, buttons and zippers pivot away from the center line. If you wear a buttoned jacket, a turned pose can cause the fabric around the top button to pucker or pull horizontally. If you notice fabric distortion when turning, unbutton the jacket or return to a straighter posture.
4. Dropping the Trailing Shoulder
When turning, people frequently lean their weight onto the back foot, causing the rear shoulder to dip significantly lower than the front one. Unless intentional, this slant can make the sitter appear off-balance. Keep your weight distributed evenly across both hips so your shoulder line remains stable.
Next Steps: Validating Your Pose and Styling
Once you have captured test photos at both angles, compare the images side-by-side at 100% crop. Check that your eyes appear level, your face remains instantly recognizable, and the collar sits comfortably.
If you are exploring different wardrobe styles, colors, or backdrop environments to pair with your preferred angle, you can use digital styling tools as a planning aid. For example, if you want to see how different jacket shades interact with your natural skin tone before purchasing or dry-cleaning garments, you can compare outfit colors on the same photo.
Tools like LookScene allow you to preview outfits, hair, and scene options generated from your reference photos. Keep in mind that LookScene serves strictly as an exploratory styling and composition aid; it does not perform identity verification, feature removal, body reshaping, or guaranteed garment fabric simulation. Always compare generated previews directly against your authentic original photos to verify likeness, and validate your final styling choices in front of a real camera.
Style options to compare
Use these illustrated directions to plan what to try. They are not verified before-and-after results; inspect the review checklist on each page.
- Clean studio portrait — Compare the eyes, jaw, hairline and skin against the original. Crop for your intended profile size after reviewing.
- Warm studio — Check that warm background color does not unnaturally tint the face.
- Garden light — Inspect hair edges and ensure foliage does not cross the face.


